Relay.app offers three classes of AI features to use as part of your automated workflows. Built-in AI actions for use cases like data extraction or text summarization are the easiest to use and to get started with. Next, there's the Custom Prompt step that offers lots of flexibility and lets you get structured data from prompts that you write yourself. Finally, you can create mini AI Agents for maximum power and flexibility while still maintaining a high degree of predictability around the execution of your workflow.
In this tutorial, you will learn:
- What AI Agents are and when to use them
- How to create mini AI Agents in Relay.app
- How to test a workflow with mini AI Agents
Introduction to AI Agents
What is an Agent?
There’s a lot of buzz around AI Agents, and for better or worse, the term is not always used appropriately. Ultimately, it’s quite straightforward:
Many products have created AI Agents that work within chatbots (i.e. you chat with the agent and give it text instructions of what to do). In Relay.app, AI Agents run automations directly within your repeated workflows, letting them do work on your behalf behind-the-scenes.
Mini AI Agents in Relay.app
The key balance to strike with AI Agents within is between the power and flexibility of the tasks they can accomplish with the predictability and control that's required for you to trust their work. At Relay.app, give you the tools you need to create mini AI Agents in your workflows that are designed to strike the right balance.
- A Prompt: A clear description of the Agent’s role, goal, responsibilities, and all relevant context included or attached to it.
- Actions: Short sequences of workflow steps (or mini workflows) that the Agent may decide to invoke once, multiple times, or never in order to achieve its goal.
Embedding mini AI Agents in your workflows give you the incredible flexibility and power that come with semi-autonomous agents, but in a very controlled way:
- The Agent “wakes up” only whenever your workflow is triggered. Because you add a trigger to each workflow that starts runs based on a very explicit event (e.g., an email arrives with the label ‘invoices’ or a deal in a CRM reaches the ‘closed won’ stage), you know when the Agent will be asked to perform its duties and what's going to happen after it's done.
- Structured data defines the interface between the Agent and its Actions, and the Agent and the remainder of your workflow. This means you can be very explicit about the type and structure of the data you expect the AI model to produce/construct, and specifically which of these are required before an Action may be invoked. The AI model might still not produce the exact outcome you expect in certain cases, but it will be very deterministic about what will happen for each of the Actions.
- Agent Actions are built using the same constructs as the rest of your workflow. This means that each action may consist of automated steps in more than 100 apps, Human-in-the-Loop steps, and flow control features like Paths and Iterators.
Like our other AI features, mini AI Agents can use any model you like: including GPT, Gemini, Claude, and LLaMA. You can freely switch between them, and reasonable GPT-4o usage is included in all Relay.app plans.
Should you add a mini AI Agent or a Custom Prompt step?
As outlined in the introduction, one of Relay.app’s other AI features is the Custom Prompt step. Similar to mini Agents, these steps offer a great deal of flexibility as you can prompt any AI model you like and define the expected output in a structured manner to use it in the remainder of a repeated workflow.
The key difference between mini AI Agents and Custom Prompt steps can be summarized as follows:
- A Custom Prompt step is a single step that takes in a prompt and produces a structured output. Automated actions/steps that use this generated output follow after the Custom Prompt step and are executed in a linear fashion. Custom Prompt steps are great for most AI automation use cases. Here is an example video of how to use a Custom Prompt step to triage customer support emails.
- A mini AI Agent may invoke one or multiple Actions (mini workflows) “at will” when the Agent is activated. It decides whether it should invoke an Action and how many times based on the AI model’s reasoning about the prompt and given context. This means that you can build dynamic workflows that perform a sequence of actions autonomously.
Both Custom Prompt steps and mini AI Agents can be configured to have internet access (i.e., to perform Google searches and access websites) in order to answer the prompt.
It is important to note that AI Agents are among the more advanced features in Relay.app and require reasonable fluency in crafting AI prompts. If you haven't yet mastered the built-in actions and custom prompt steps, start with those.
Creating a mini AI Agent
Now that we’ve learned about AI Agents and what makes them special, we’ll learn how to create one in Relay.app. We’ll do so in five steps, and as an example use case, we’ll create the one that’s shown in the demo video above: a mini AI Agent that processes meeting notes.
The Agent’s role and responsibilities:
- Every time an email is received that’s tagged to contain meeting notes,
- The Agent should review the meeting notes and create tasks in Asana for the action items assigned to a particular person
- Plus, send out a summary of the meeting to the team over Slack afterward, including the total number of action items
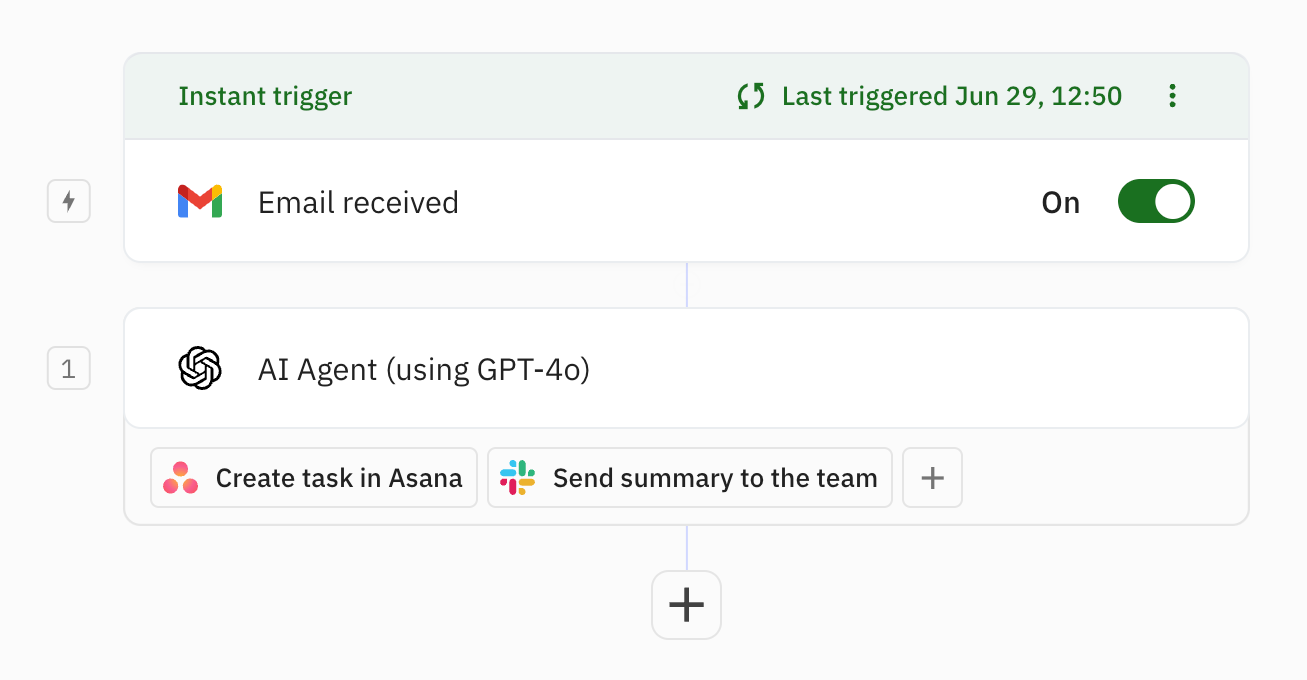
This means that we’ll end up creating an Agent with two actions: one small action to create tasks in Asana and another one to send out the summary over Slack.
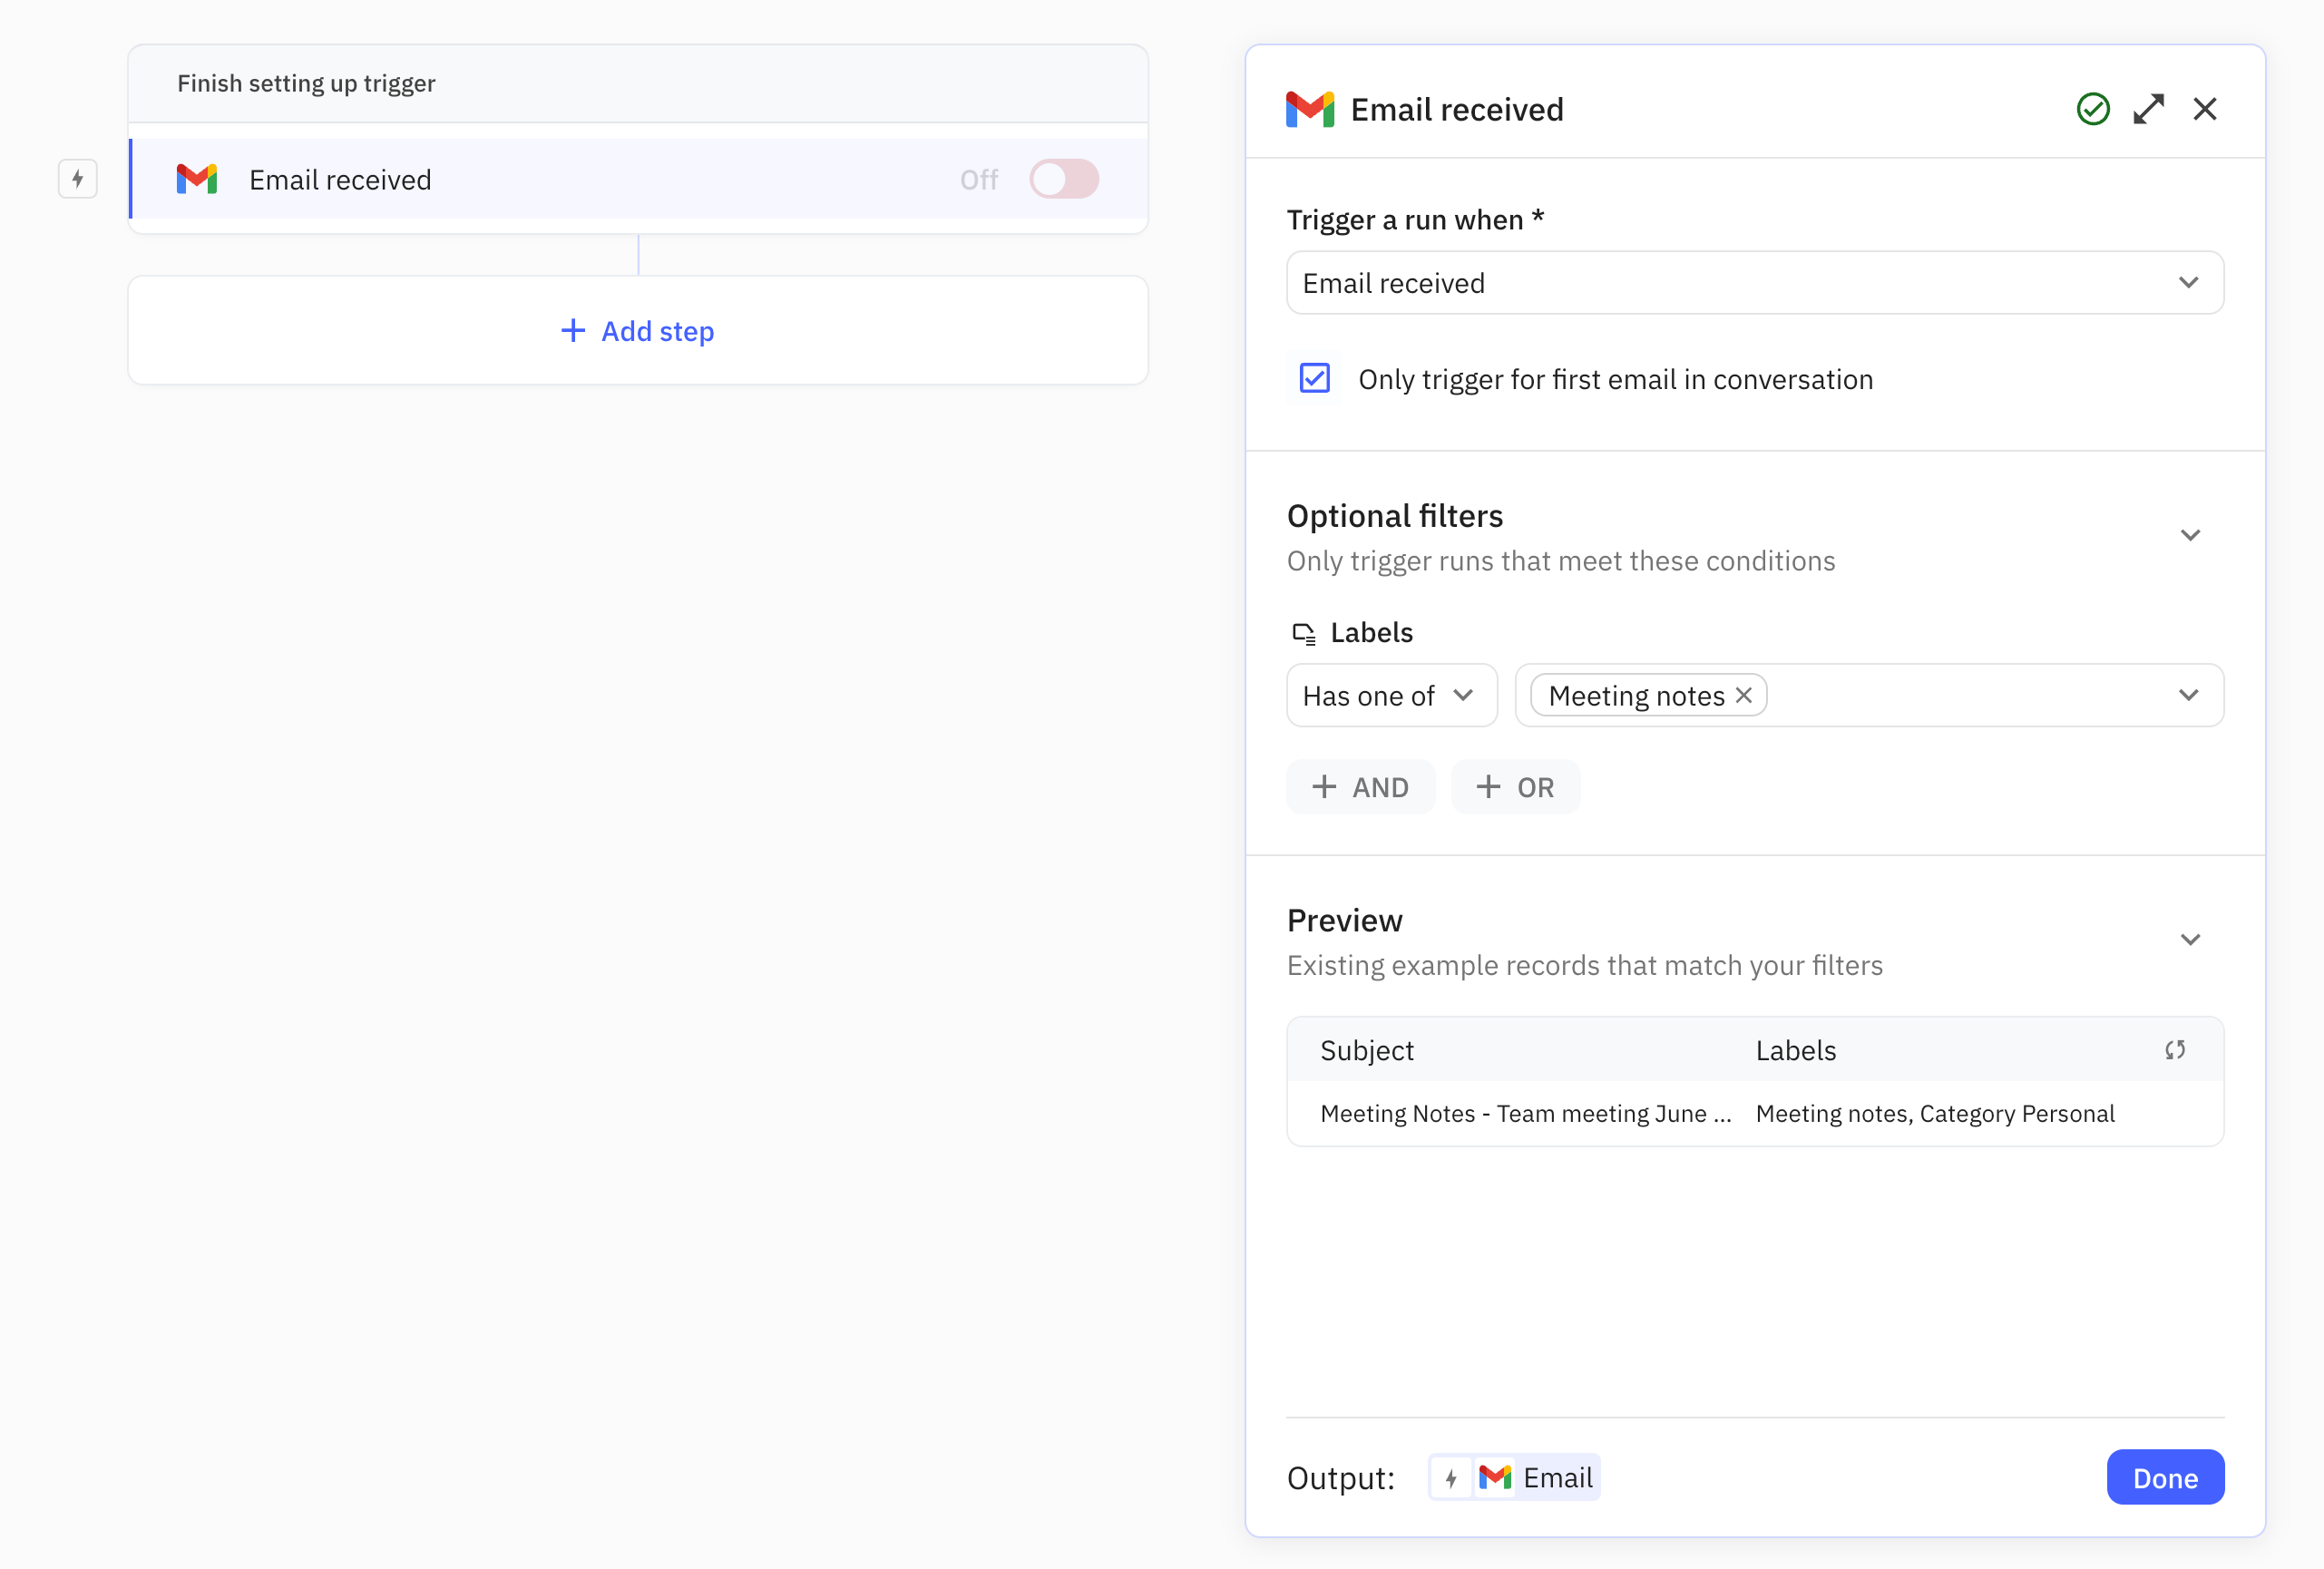
1. Create a New Workflow and Set Up a Trigger
Start by creating a new workflow and adding a trigger. For our example, we’re adding a Gmail trigger that starts runs every time an email is received that has the ‘Meeting notes’ label.
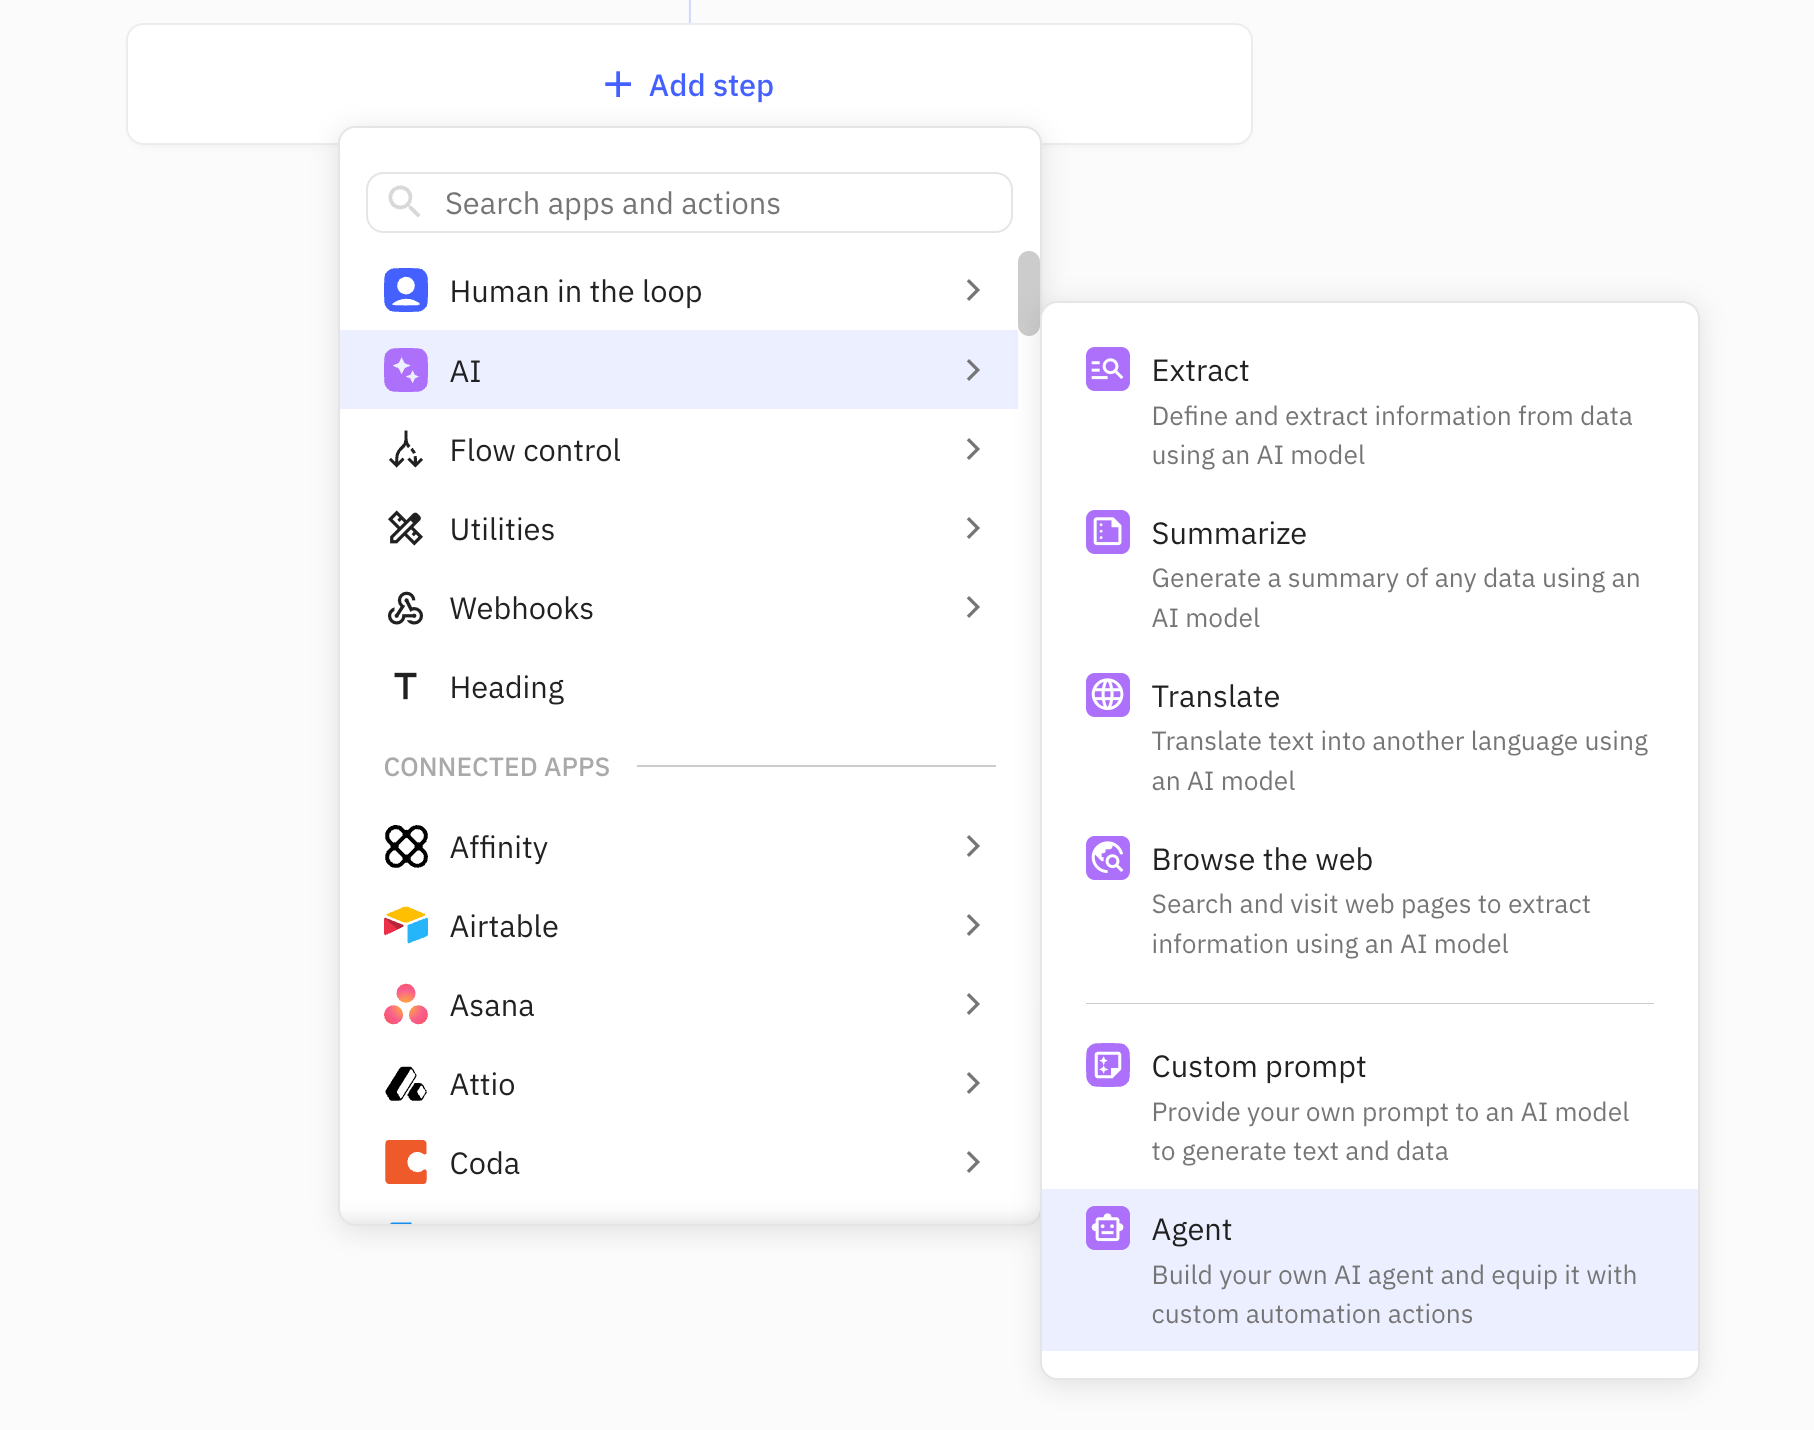
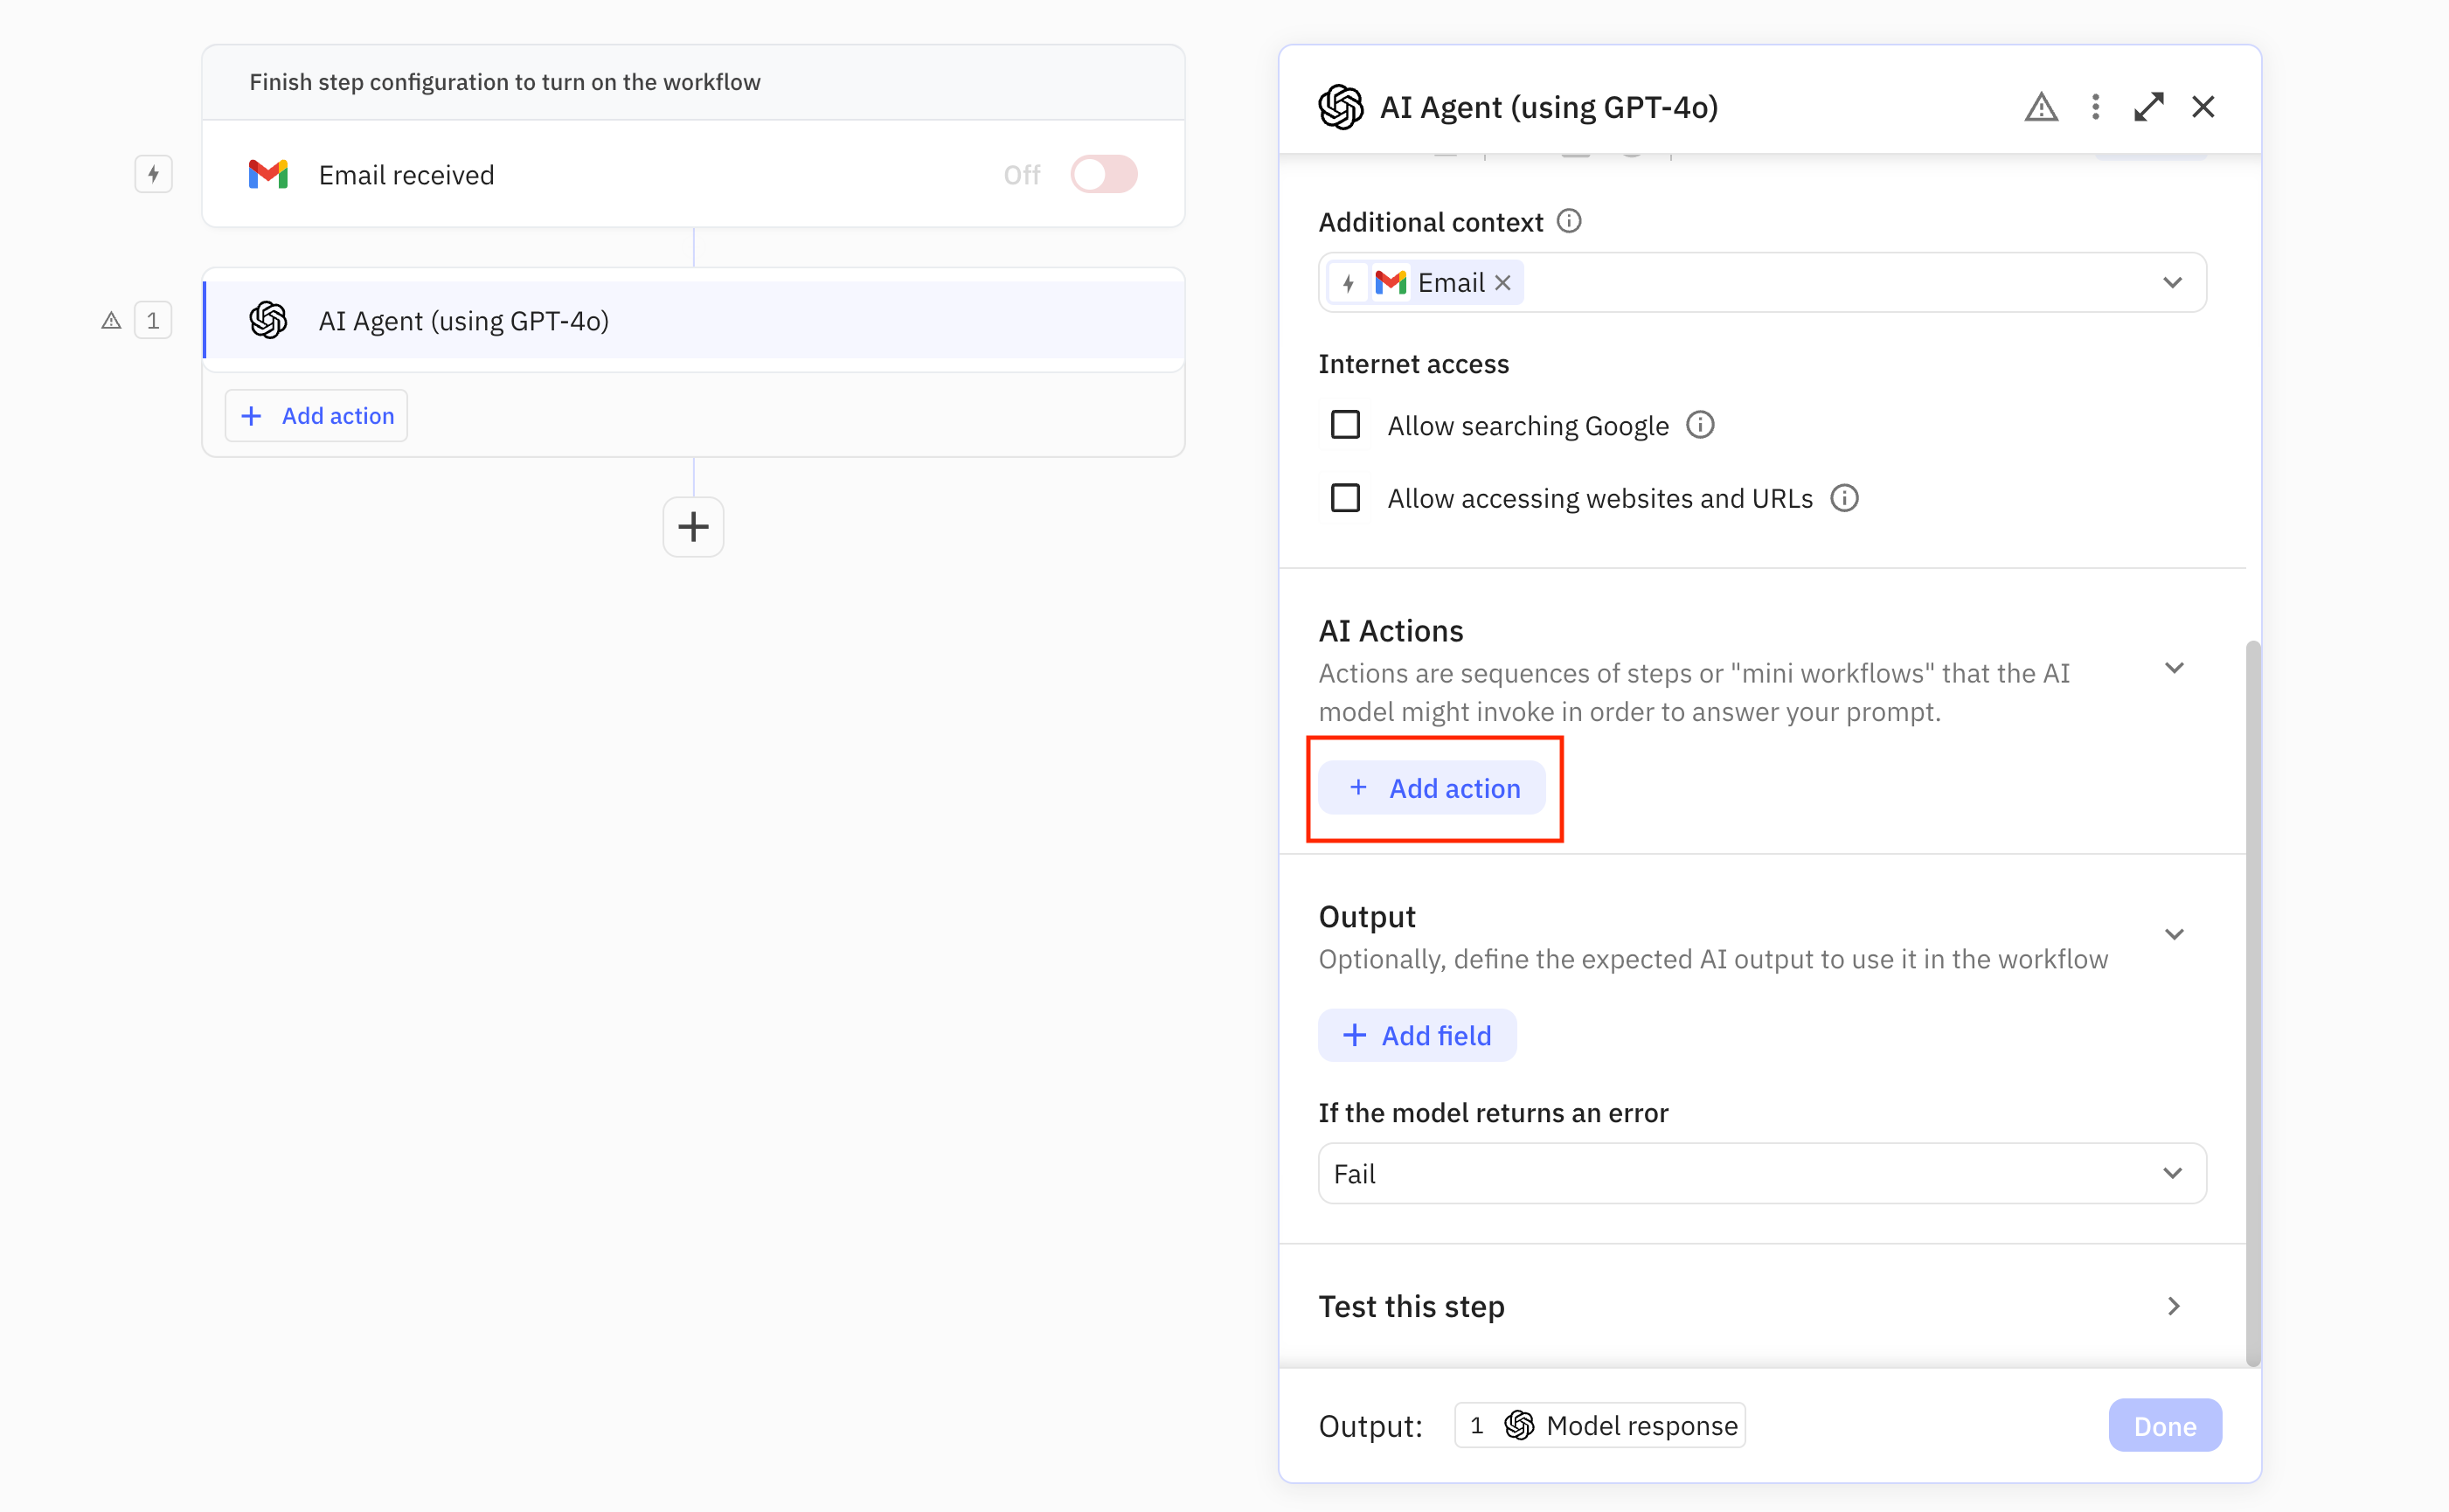
2. Add an AI Agent to the Workflow
Next, add an AI Agent step, which can be found under the ‘AI’ section of the step menu.
3. Set Up the Prompt
As described above, setting up the Agent requires us to do two high-level things: setting up the Prompt and then adding Actions. We’ll now set up the Prompt.
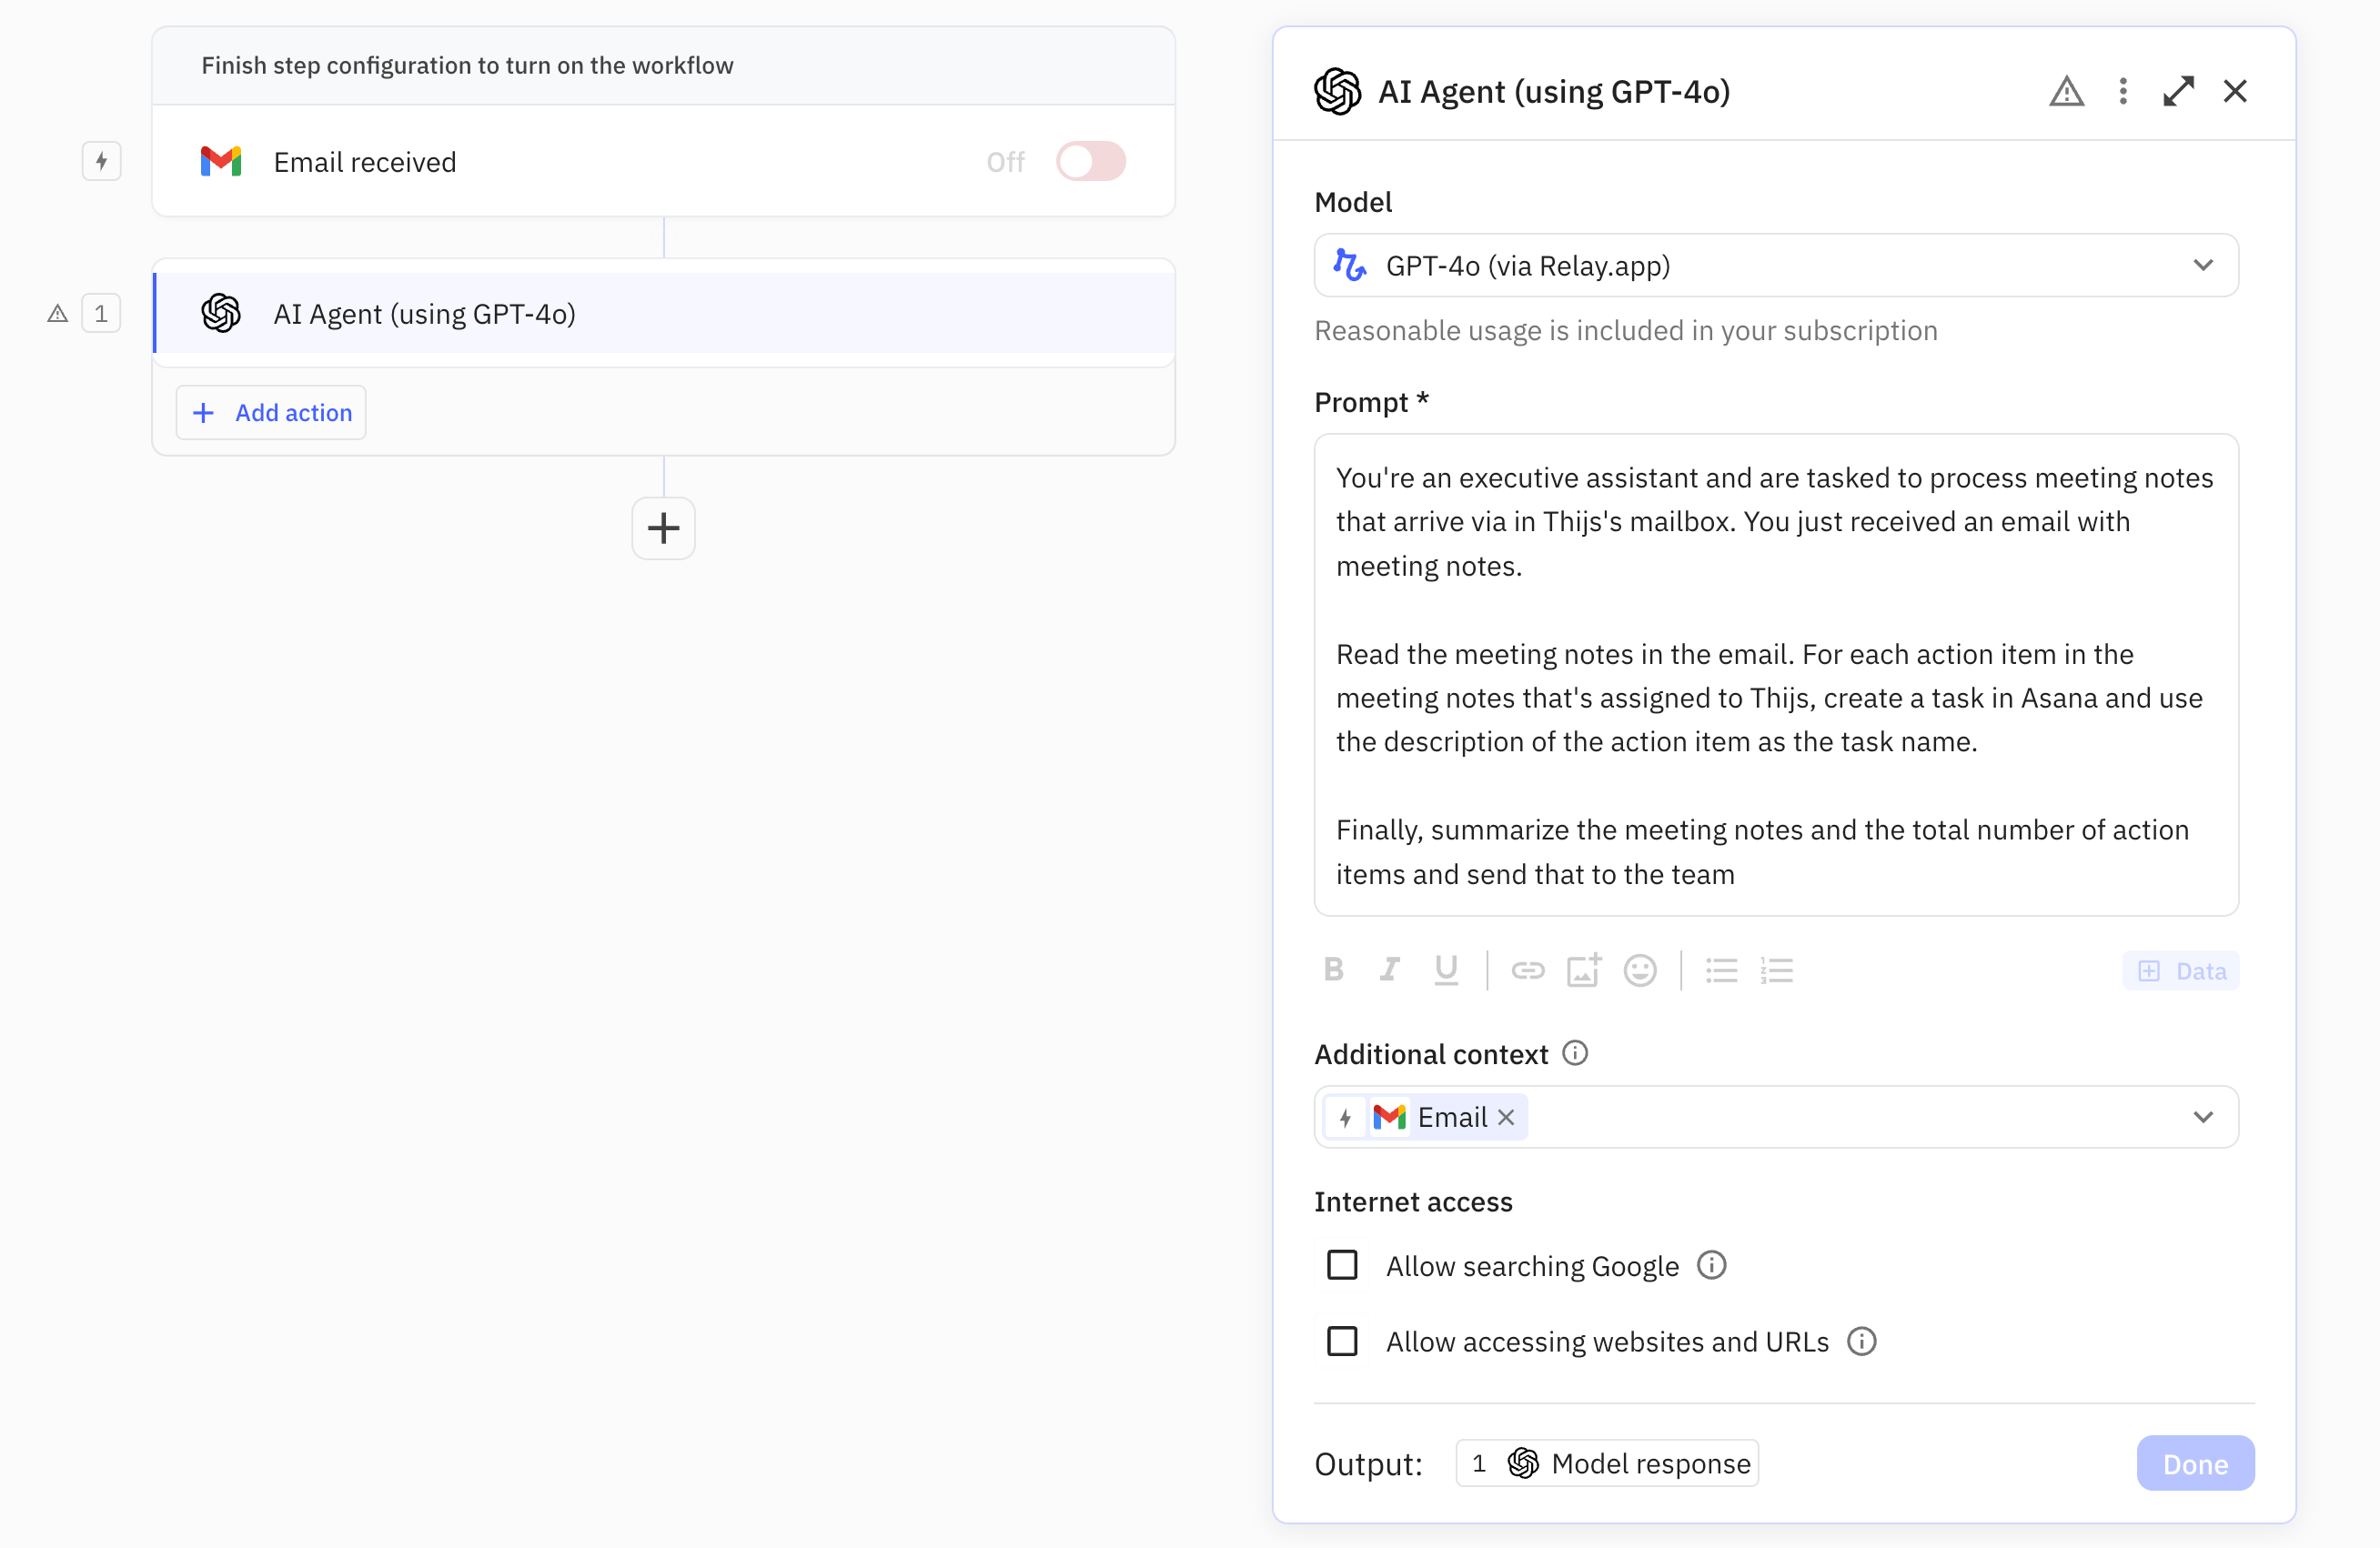
First, pick an AI model to use. Reasonable use of GPT-4o is included with your Relay.app plan and will work well for AI Agents. In our experience, GPT-4(o) and Claude 3/3.5-based models perform best when used with Agents. Groq's LLaMA-based models will work as well, but they won't perform as well as GPT-4 or Claude 3. As it stands, Perplexity’s models don’t support Actions, so they are not suitable for Agents.
Next, we’ll write the prompt. The prompt should contain the role, goal, and responsibilities of the Agent. The Agent’s responsibilities are expressed as Actions, in clear words.
In our case, the agent is expected to:
- Read the meeting notes that arrived via email,
- Create tasks in Asana for each action item that’s assigned to a specific person,
- Summarize all the meeting notes including the total number of action items and share that with the team.
A possible prompt for this is the following:
You're an executive assistant and are tasked to process meeting notes that arrive via in Thijs's mailbox. You just received an email with meeting notes.

Read the meeting notes in the email. For each action item in the meeting notes that's assigned to Thijs, create a task in Asana and use the description of the action item as the task name.

Finally, summarize the meeting notes and the total number of action items and send that to the teamContext/data for the Agent can be embedded inside the prompt (by inserting variable fields just like when composing an email containing variables), and/or can be attached separately as ‘Additional context’.
In this case, let’s attach the entire Email object to the Agent that entered our workflow via the ‘Email received’ trigger.
Finally, you may give your Agent access to the internet, specifically to Google to search the web and/or give it the ability to visit websites it found via Google or got the URL for otherwise (e.g., because it was present in the prompt/context).
For our use case, we don’t need to give the Agent internet access, so we’ll leave these unchecked.
4. Set Up the Actions
Now that the Prompt is set up, we’ll set up Actions. Make sure to create Actions for all the responsibilities the Agent has. Think of Actions as units of work that may be done once, never, or multiple times as needed.
For our use case, we’re going to create two Actions:
- The first action gives the Agent the ability to create tasks in Asana.
- The second action gives the Agent the ability to share the summary with the team.
Add Actions by clicking + Add action.
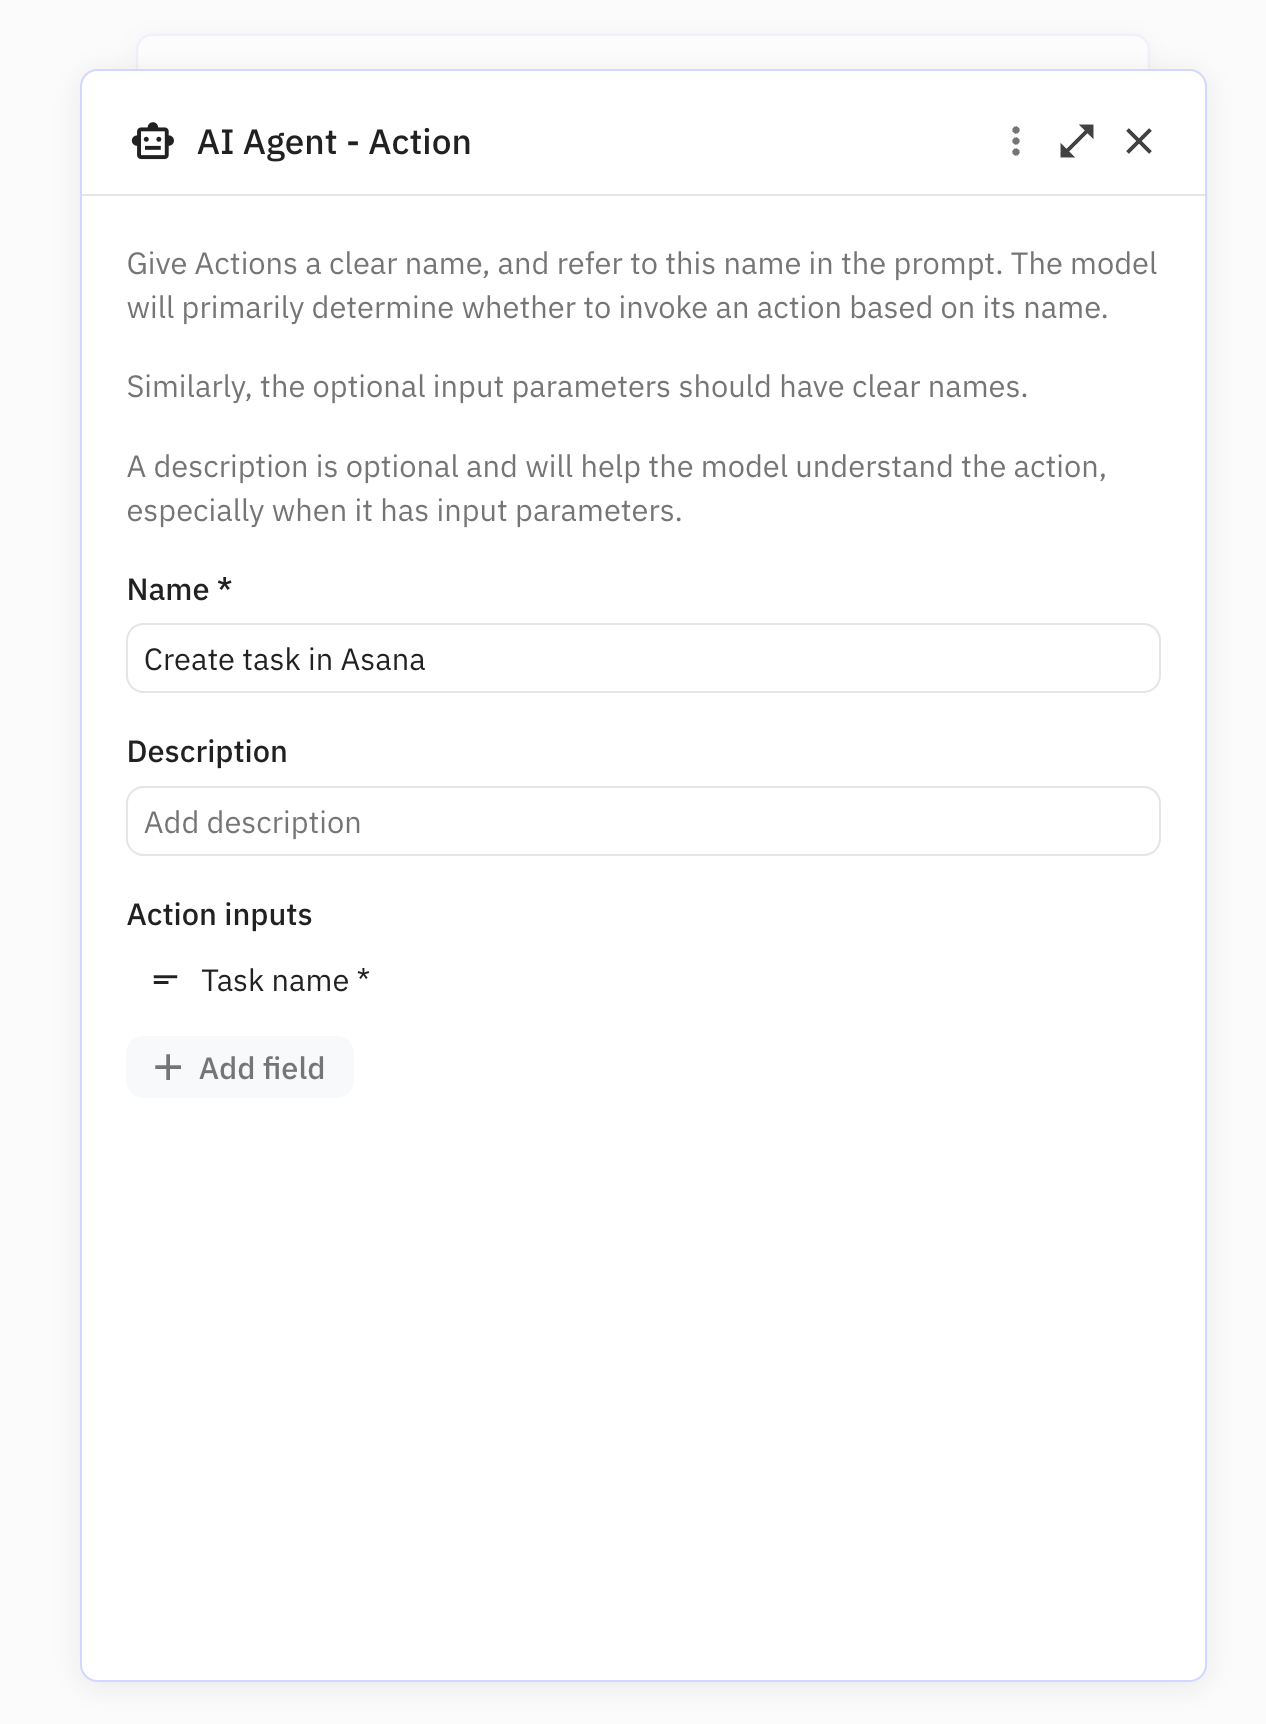
First, we’ll need to define the Actions. Each Action consists of:
- A name: The name should be clear, descriptive, and ideally reflect the language that’s used in the prompt.
- A description: The description can be used to provide additional context to the model around what this Action will do and what’s needed. Adding a description is optional and is particularly helpful when distinguishing between multiple Actions or when the Action has multiple input variables.
- Input variables: These are typed inputs that the steps inside the Action need in order to run successfully (see below). Most Actions will need input variables, though technically they are optional.
Let’s name our first Action “Create task in Asana.” Because this name is pretty clear and we use it literally in the prompt where we describe the Agent’s responsibilities, we don’t need to add a Description. This Action needs one input parameter: a Text input that we’ll name “Task name.” The Agent is expected to feed this input with a description of a single action item from the meeting notes it read.
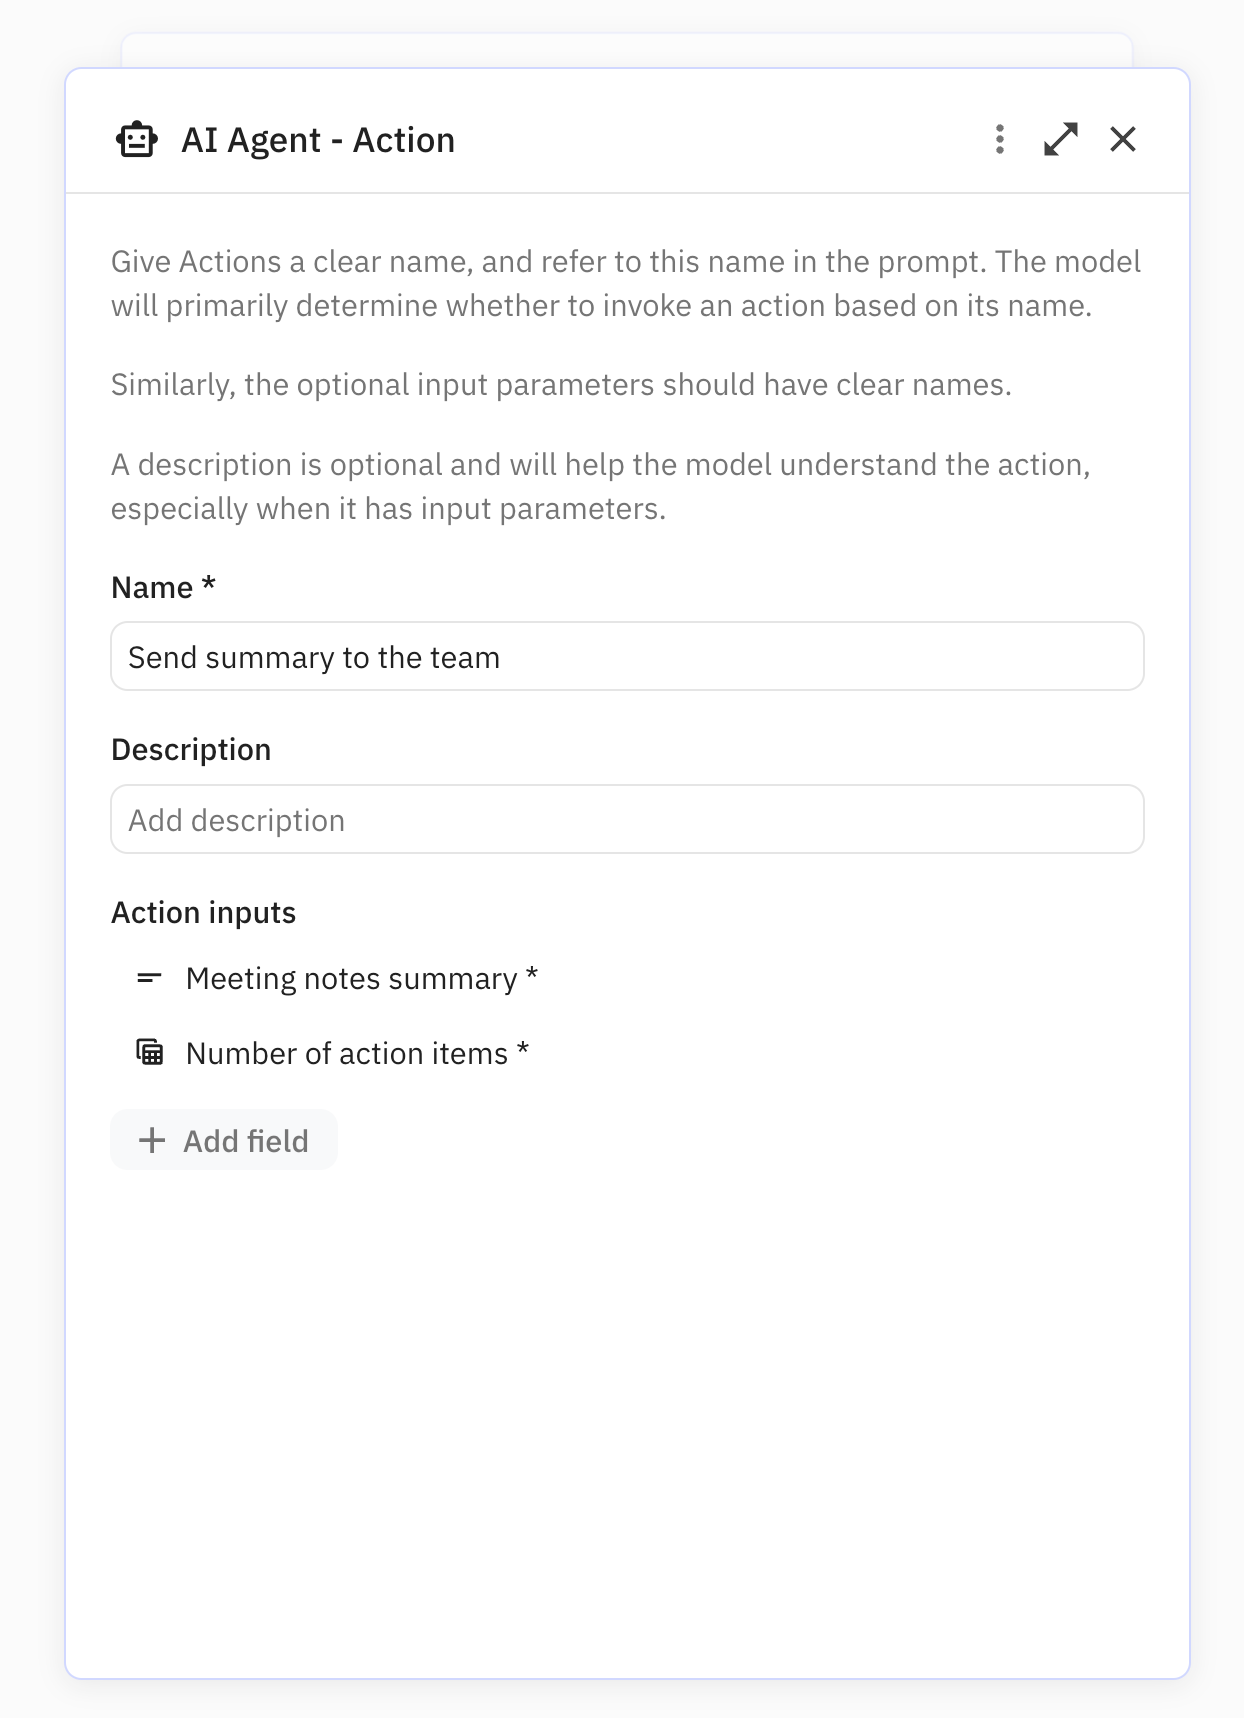
We’ll name the second Action “Send summary to the team.” For the same reason as above, we can leave the Description empty. This Action will need two input parameters: a Text input for the meeting notes summary and a Number input for the total number of action items.
Finally, it’s time to add steps to our Actions. In each Action, we can add as many steps as we want, including Human-in-the-Loop steps and flow-control blocks like Paths and Iterators.
For our ‘Create task in Asana’ Action, we’ll just add one step: a ‘Create task’ automation from the Asana menu. We’ll reference the Action’s ‘Task name’ input parameter to populate the automation’s ‘Task name’ input.
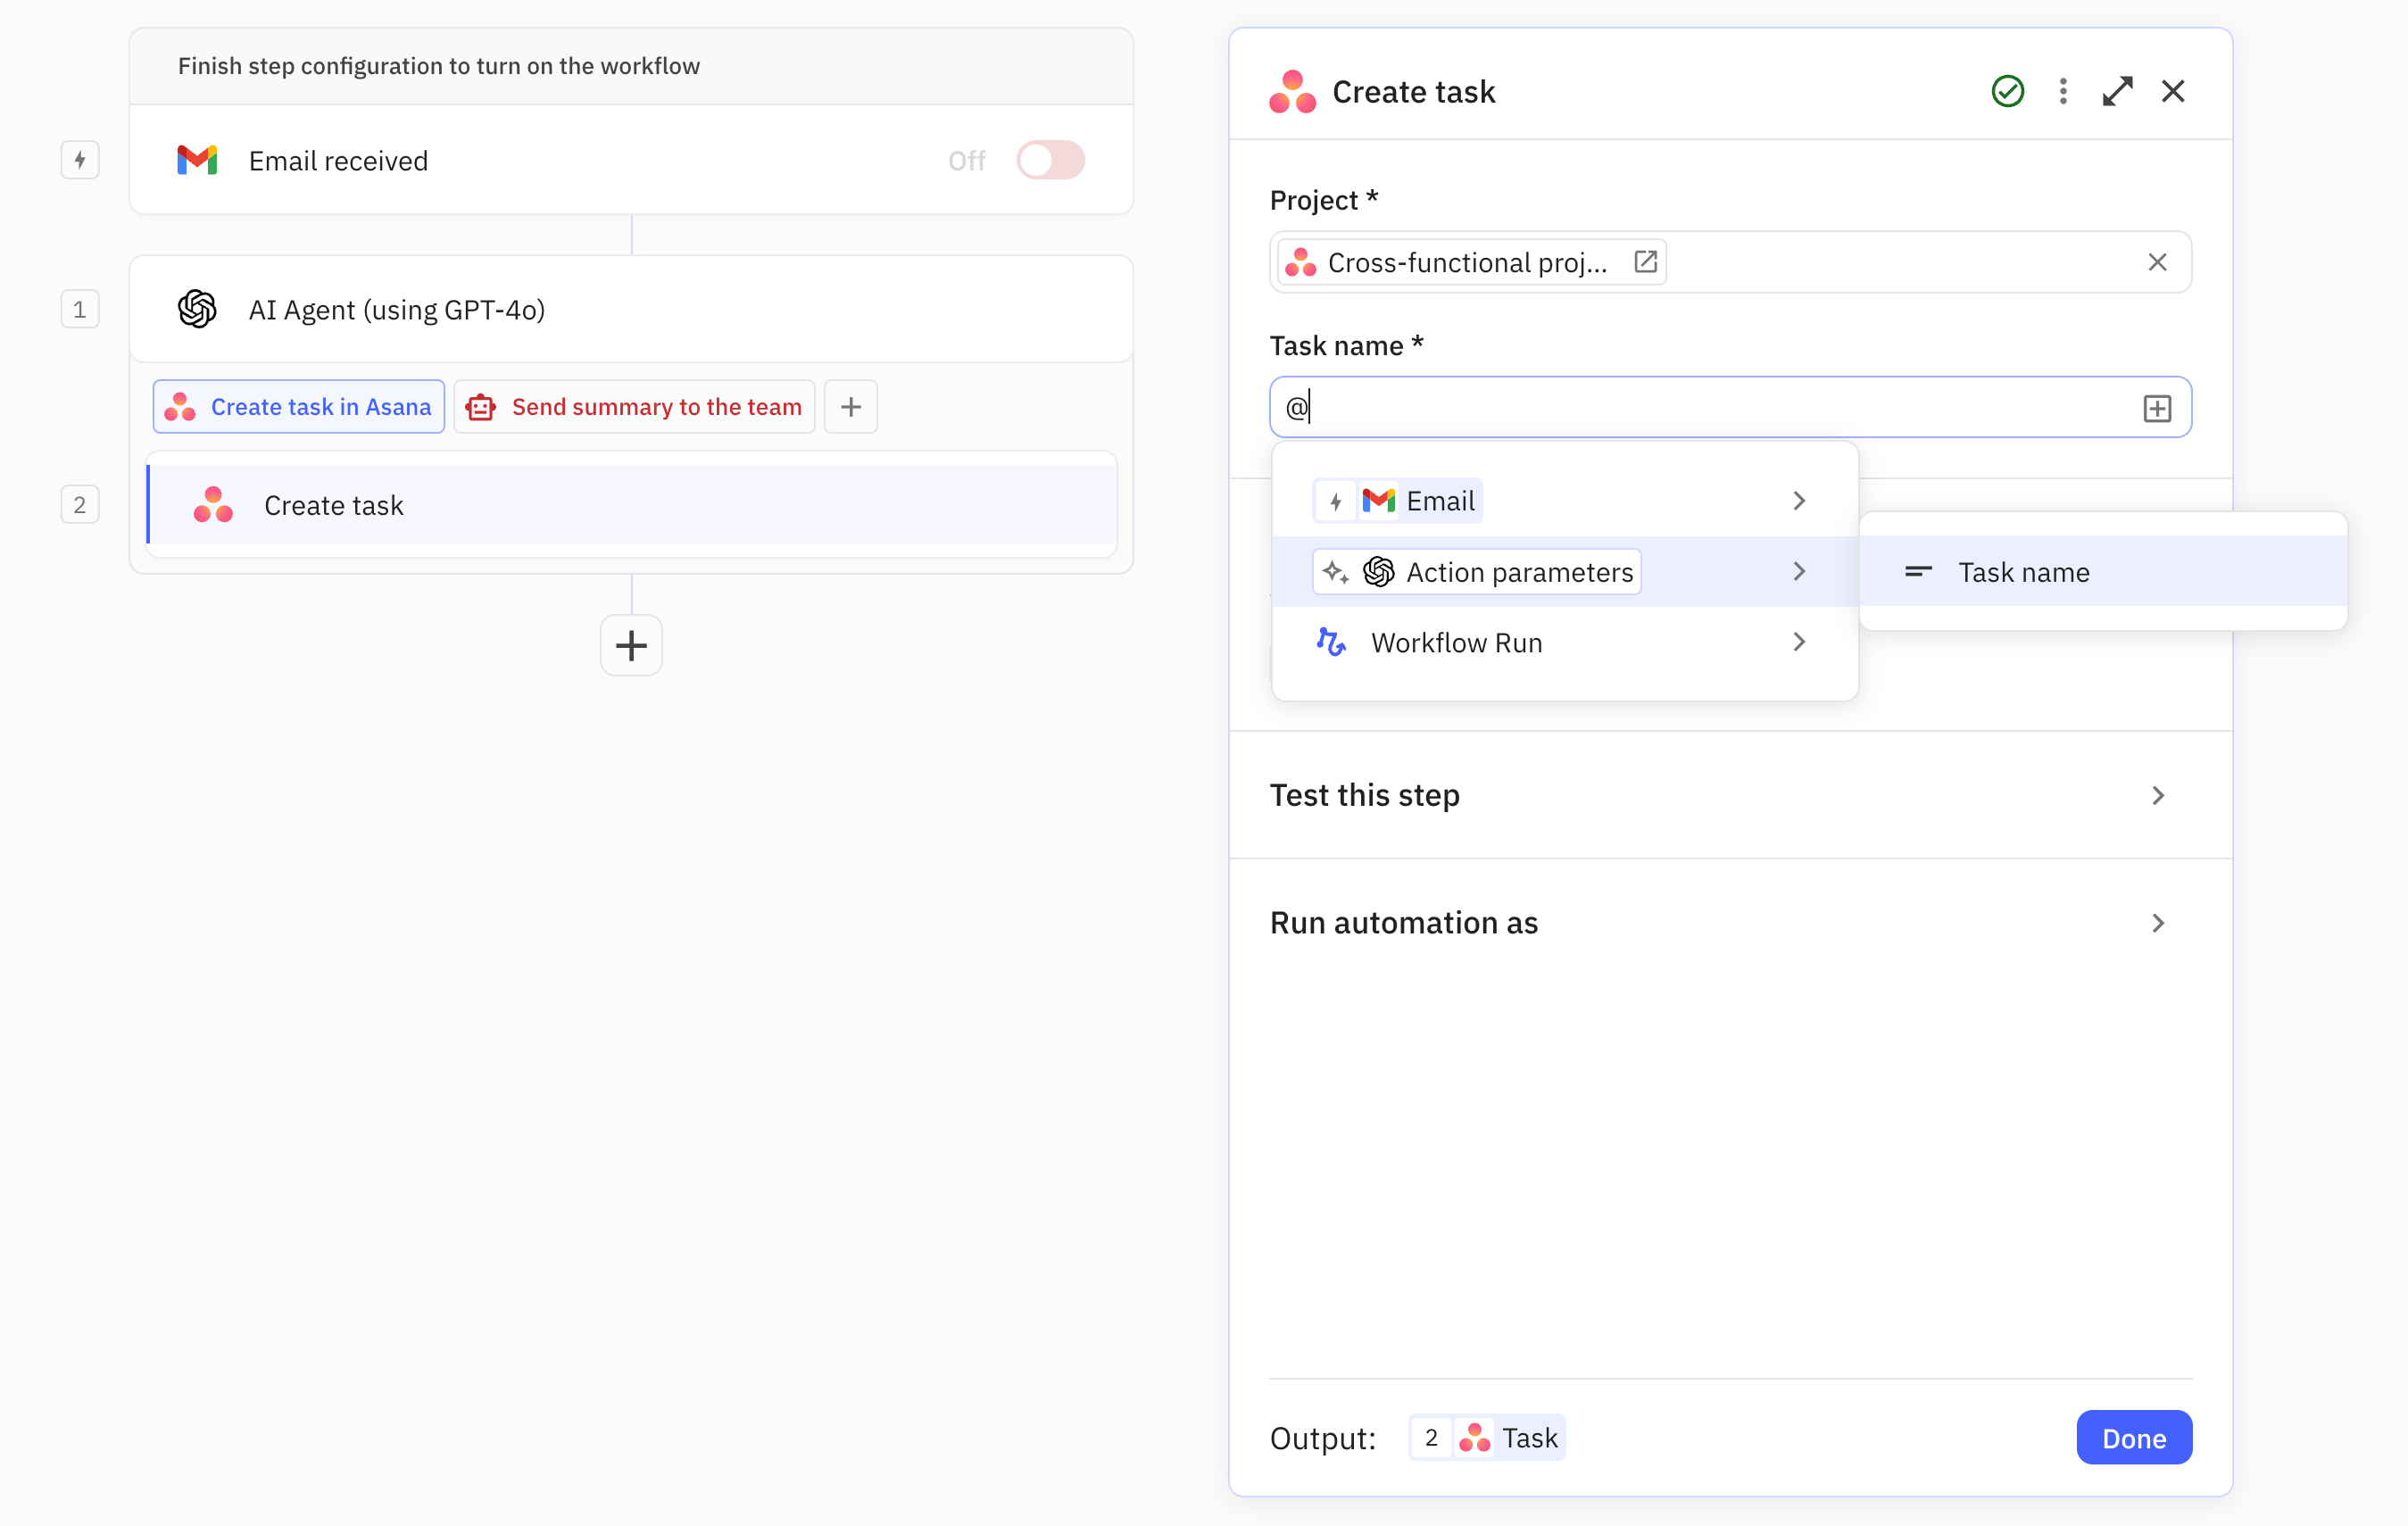
For the ‘Send summary to the team’ Action, we’ll also just add one step. In this case, a Slack automation to send a message. In the message body, we’ll reference the Action’s input parameters to embed the meeting summary and total number of action items in the message body.

That’s it! You just created your very first mini AI Agent. Next, let’s test it.
Testing
Testing mini AI Agents is easiest by testing the entire workflow they’re embedded in. To kick off a test run, click Start a test run on the trigger step.

Next, pick a resource to trigger the test run on. In our case, a previously received email. The dialog will show a number of recent emails that match the trigger filter criteria I specified.
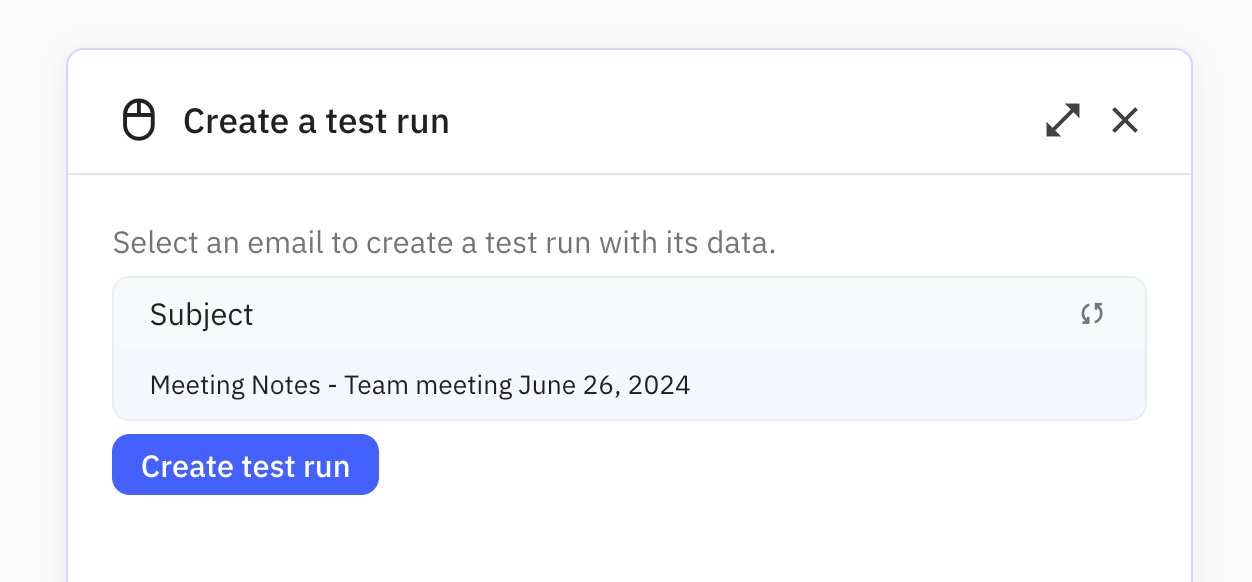
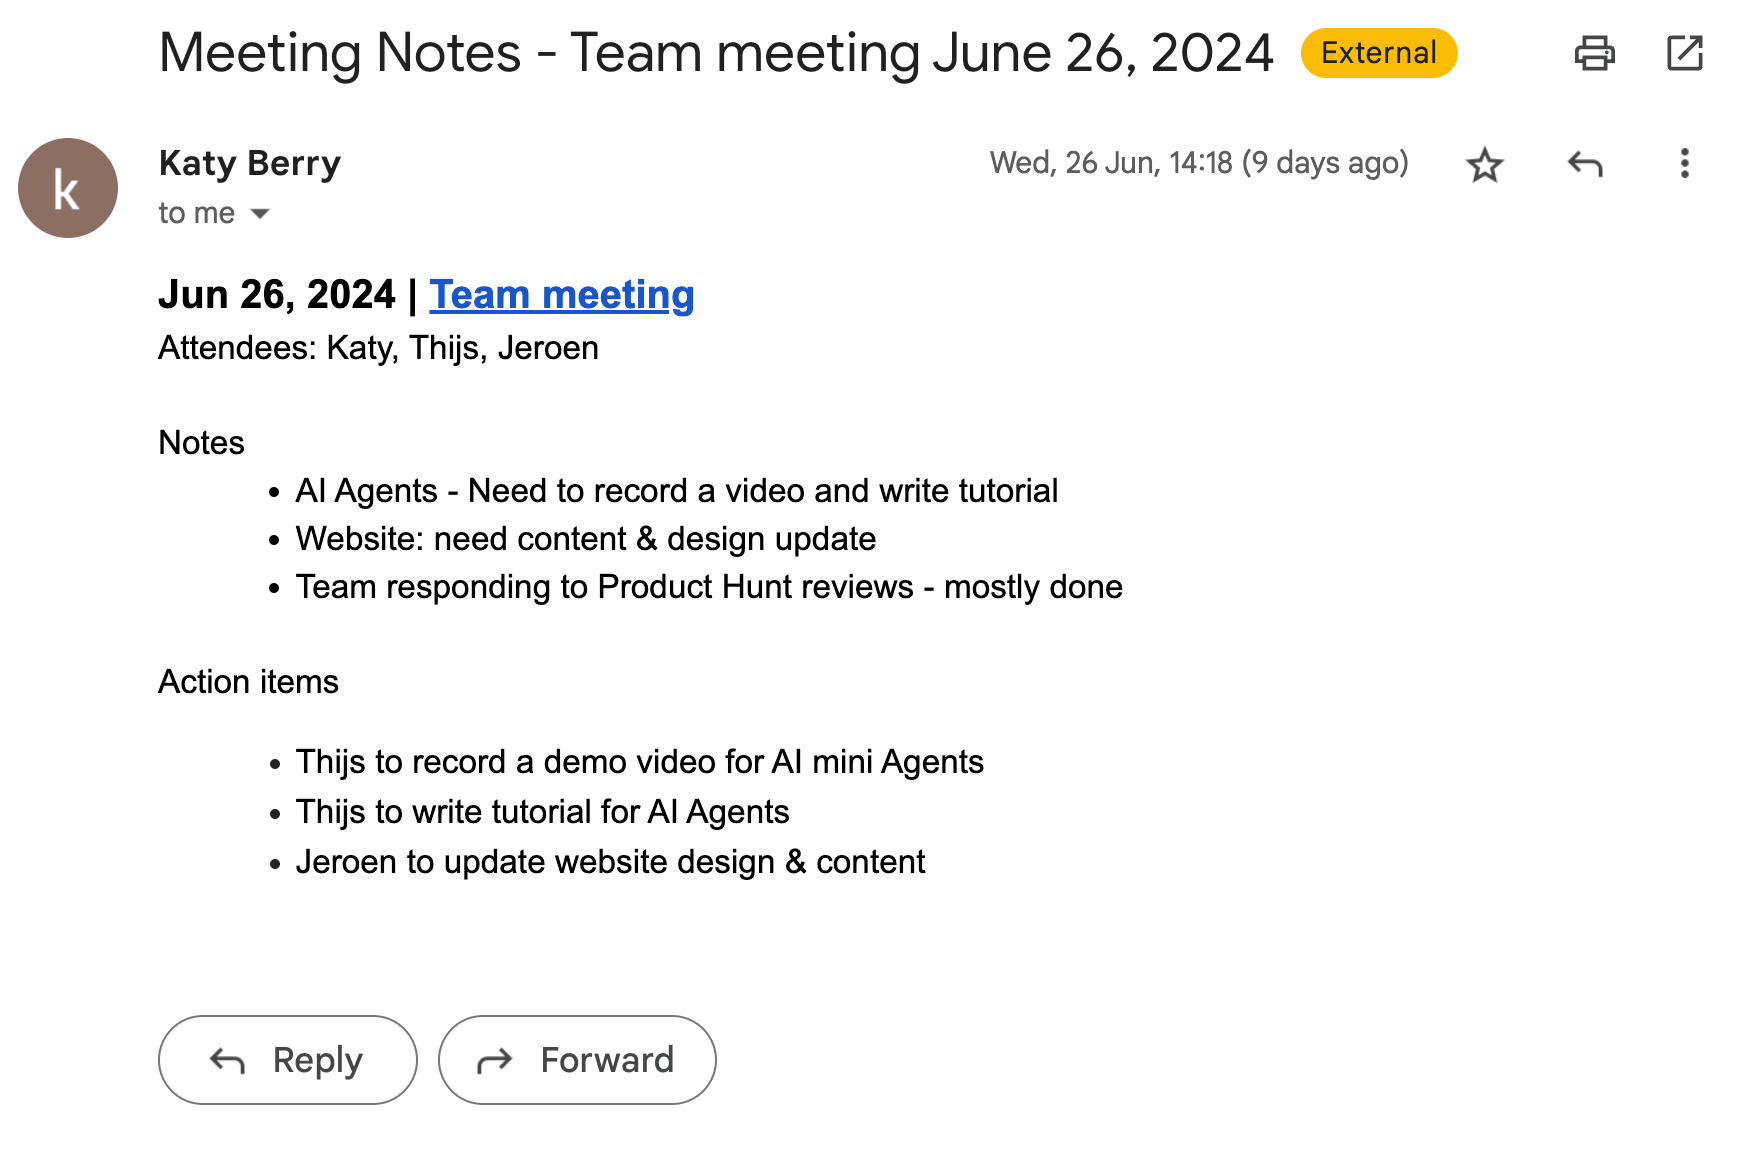
The specific email I’ll use as an example contains meeting notes with three action items, of which two are assigned to me. So on a successful run of the workflow, we’d expect two tasks to be created in Asana. But in the message to the team, we expect the total number of three action items to be called out.
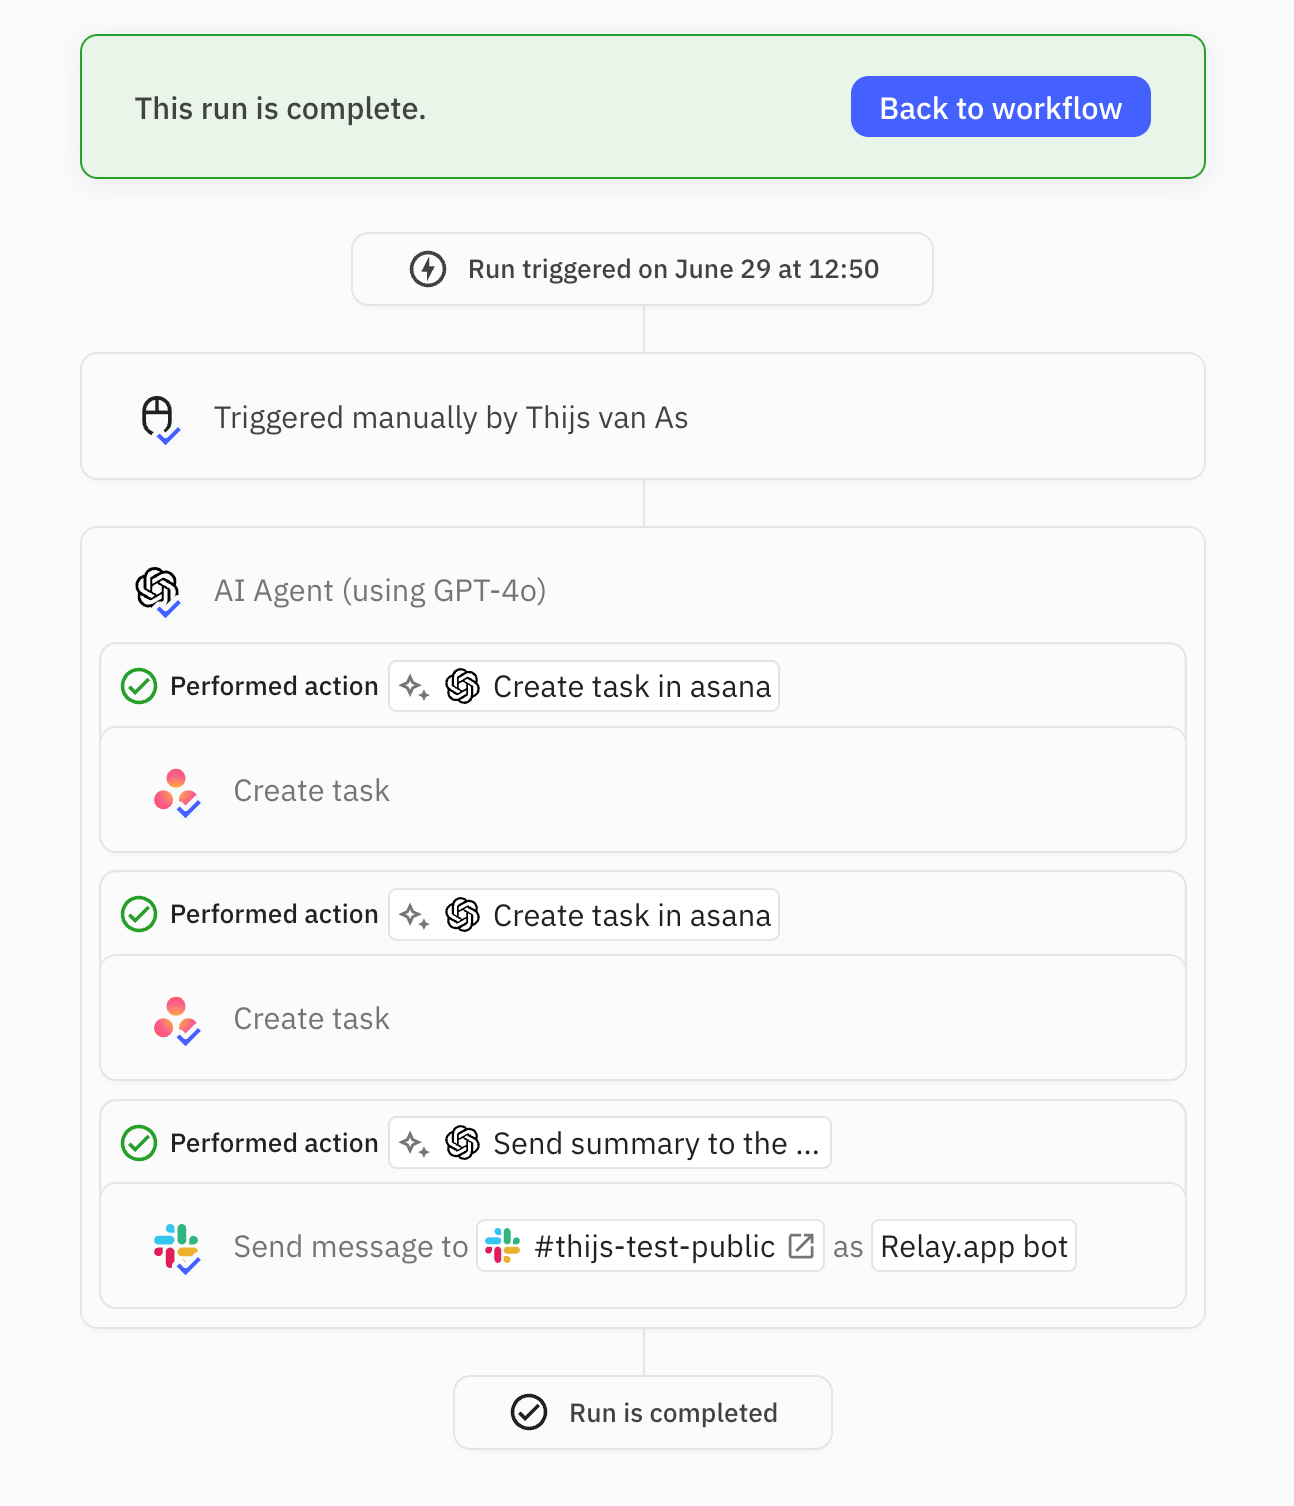
After kicking off the test run, the Agent will invoke Actions as needed. Once finished, the run overview will show which Actions were invoked and how many times. In the screenshot below, we can see that as expected, two tasks were created in Asana.
Debugging
Creating AI Agents successfully is often an iterative process and typically requires some experimentation with constructing a prompt that works well.
To help in this process, you can access the conversation history of the AI model, including debugging information on what led to certain Actions being called.
And that’s all! Now turn on your trigger to put your Agent to work every time a new email arrives with meeting notes.

